| 2.2 The control level | ||
|---|---|---|
| Chapter 2. Programming with Pd for the first time | |
|
First we have to work through the basics of the control level in Pd. As already mentioned, Pure Data works only with data, i.e., with numbers (and the help of letters). (In the examples, however, we will be working with processed sound as soon as possible.)
As previous mentioned, computers only work with numbers. Pd works with both numbers and "symbols", in other words letters. But numbers are of even greater significance; in the first example we saw how important parameters like the pitch or volume of a sound are not determined in Pd using the traditional musical indications like C4 for a pitch or pianissimo for a dynamic, but rather exclusively using numbers. For this reason, we're going to spend some time learning the basics about how Pd processes numbers in the control level:
You can enter numbers in both number boxes or message boxes. Some objects allow mathematical operations to be performed using these numbers. Create the object "+" and connect number boxes to its right and left inlets as well as one to its outlet:
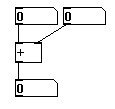
Enter a 4 in the right upper number box (in Execute Mode: click the number box once, type the number, press ENTER) and 5 in the left upper box. The number 9 - the sum of 4 and 5 - appears in the lower box. The "+" object has two inlets in which we can enter numbers and one outlet in which the result processed by the object (in this case a process of addition) appears.
This example illustrates an important rule in Pd: with control objects that have several inputs, you have to enter data into the inlets from right to left. In other words, an object receives input. It will only create output based on this input when it receives input from the far left inlet. (One distinguishes between "cold" inlets, which do not cause an immediate change, and "hot" inlets, which trigger an immediate visible change when data is entered into them.) We will encounter this rule constantly.

The other basic mathematical operations - subtraction, multiplication, division, and powers - follow the same principle:

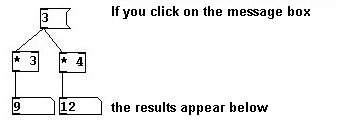
If you want to perform several operations using one number, e.g., 3*3 and 3*4 then just connect the number or message box to several inlets (for the sake of simplicity we will use arguments ("*3" and "*4") instead of input for the multipliers. In the previous examples, we used inputs instead of arguments. If we enter an object without an argument, Pd assumes a value of "0" for the argument):
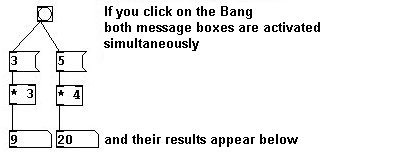
If you want to perform two different calculations at the same time, you have to transform one mouse click into several using a "bang" (Put Bang or Shift-Ctrl-B). You can click the bang in Execute Mode.
If you then want to add these two results, you have to make sure that they enter the "+" object in the correct order, i.e., from right to left.
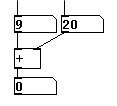
To ensure this, there is what's called a "trigger" object:
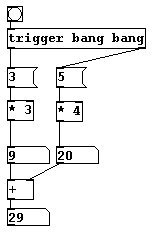
"trigger" can receive as input a bang, a number, a symbol, a pointer or a list (more about pointers and lists later). Once started in this way, "trigger" gives this input or transforms it into a bang as output from right to left. The output from a "trigger" object is determined by its arguments (bang, float, symbol, pointer, list). In this case, the arguments are two bangs and two outlets are created (an outlet is created for every argument you enter).
To save space, you can omit the number boxes from the first operations for the results you want to add, simply using the outputs from above directly as inputs below. If you ever want to know what value is being sent, just attach a "print" object to the output.
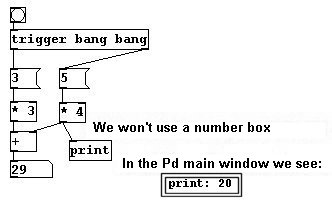
A "print" object's input will appear in the Pd main window. All errors that occur also appear in this window. For example, if we try to create the non-existent object "zzzgghhh", it will not be created and an error message ("zzzgghhh ... couldn’t create") appears in the Pd main window.
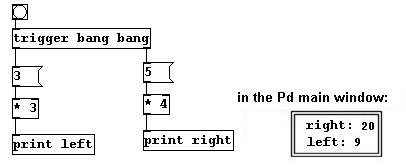
You can use this window to clarify the way "trigger" works by creating numerous "print" objects and giving them different arguments. The results appear in the Pd main window under each other, i.e. one after the other chronologically (for more on order of operations, cf. 2.2.1.4):
Larger mathematical expressions can be programmed using the "expr" object. The argument in this case is the expression itself (using parentheses where necessary, just like back in math class!):

To generate the result, you have to give it a bang.
You could also use "variables"; they are called $f1, $f2, $f3 etc. (counting begins with 1). This creates inlets from left to right in which values for the variables are entered (as always, the output is generated only once the leftmost inlet receives a value. So you have to ensure that all other values have been entered before the leftmost one).

N.B.: If you want an "expr" operation (without input) to generate a 'float number' (i.e., a decimal value, not a whole number), then you have to include a decimal point in one of the values in the operation (for more on floats, see 2.2.1.4).

Exponential functions (a.k.a. 'raise to power' operations) follow this syntax: "expr pow ([Basis], [Exponent])". For example, to raise to 2 to the 3rd power: "expr pow (2, 3)".
"moses": The input is a number; "moses" decides, by evaluating whether this input is smaller than / larger than/equal to the argument, which outlet will receive it. If you give "moses" an argument of 10 and give it an input that is smaller than 10, this input comes out of the left outlet. If the input is 10 or greater, it is sent to the right outlet.

"select" (usually abbreviated to "sel"): Input is a number, output is a bang only when the input is the same as the argument. Any other numbers received as input come out the bottom right outlet.

Relational tests
"==": If the left input is the same as the argument or the right input, the output is 1, otherwise 0:

">=": If the left input is larger than or equal to the argument or the right input, the output is 1, otherwise 0.
">": If the left input is larger than the argument or the right input, the output is 1, otherwise 0.
"!=": If the left input is not equal to the argument or the right input, the output is 1, otherwise 0.
"<": If the left input is smaller than the argument or the right input, the output is 1, otherwise 0.
"<=": If the left input is smaller than or equal to the argument or the right input, the output is 1, otherwise 0.
Two more mathematical modules:
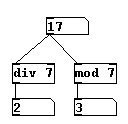
The result of a division operation (the quotient) can be expressed in decimal form (17 / 7 = 2.428) or in the form of a 'remainder': 17 / 7 = 2 remainder 3. A quotient with a "remainder" can be achieved in Pd with "div" and "mod":
Then there are also other important mathematical operations (for more specific information on these functions, please consult a high school mathematics textbook):
"sin" = Sine
"cos" = Cosine
"tan" = Tangent
"log" = (natural) Logarithm
"abs" = Absolute value
"sqrt" = Square root
Finally, there is an algorithm (algorithms are mathematical operations that the computer calculates using entered values):
"Random" creates a random number within a given range. The lower limit has a default value of 0, the upper limit is entered as an argument (whole numbers only). The upper limit is exclusive; i.e., if you enter "random 4", every time the object receives a bang as input it will randomly select an output of 0, 1, 2, or 3.

Another important object in the context of number operations is the "float" object (abbreviated: "f"). This object is used to store numbers. When you enter a number into the right input, it is saved in the object for later use. If you send a bang to the left inlet, the number stored in the object is sent as output (for more on "float", cf. 2.2.1.4).
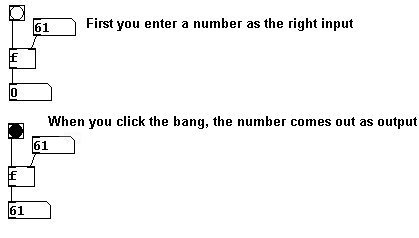
You can also send a number directly into the left input. This causes it to be sent as output immediately. The number is also stored in the object for later use and can be resent using a bang.
Often in Pd, you'll want to use a "counter" that counts in whole numbers starting from a given input value. Here's an example:

Explanation:
First you give the "f" object a starting value of "0". The first time you click on the bang in the upper left, the "f" sends a 0 to the "+ 1" object. This object then generates 0 + 1 = 1. This 1 then goes into the right inlet of the "f" object. The next time you send a bang, this 1 is sent as output to the "+ 1" object, which in turn generates a 2.
The objects for mathematical operations demonstrate clearly an important rule in Pd: the inputs for a control object should always be entered from right to left. To ensure this is the case, we often need to employ a "trigger" object, which sends outputs from right to left one after the other.
A "bang" is like a mouse click, that can be sent or received.
The "print" object displays in the Pd main window outputs generated when running your patch. Outputs sent one after another in time appear underneath each other in the list; i.e. the output at the bottom of the list is the most recent.
Now let's take a look at how to apply these concepts (everything dealing with sound will be explained later):
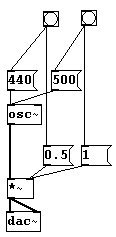
If you want to switch between two frequencies - a low quiet tone and a high loud one - you could use the following patch. Switch between tones by clicking on their respective bangs:
To produce a dyad, you'll need two "osc~" objects. In the following patch, moving the values in the number box up and down will produce a vertical interval (here, a perfect fifth) at various pitches:
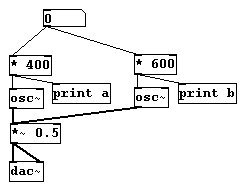
Because "print" objects are present, the frequencies of these two tones will be displayed in the Pd main window.
Indeterminacy!

Every bang you send will generate a pitch between 200 and 1000 Hertz – a random melody.
Now a few more examples of mathematical operations:
A value that composers need to calculate again and again: you've written a piece with 324 quarter notes at a tempo of quarter = 72. How long is the piece in seconds?

Result: 270 seconds or 4 minutes 30 seconds.
This counter counts only from 0 to 6; after the 6, it starts again at 0.

If you've understood everything thus far, you should be able to handle the following challenge - but be warned, it's not easy:
Create a patch that generates random numbers where the same number never occurs twice in a row (unlike the normal "random" object). When you've finished, compare your patch to the solution. Good luck!
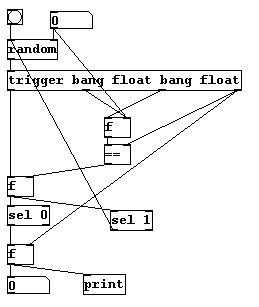
a) Create two random melodies that run simultaneously.
b) Create a patch where two bangs select two different intervals of your choosing (like the two bangs/two frequencies example).
c) Use "expr" to calculate exponential functions, e.g. y = x2, y = x (2+x); or y = 1 - (2x).
A bang is like a mouse click. You can click it and have it pass on this click; i.e., it can receive a click as input and then in turn sent a click as output. However, this input doesn't have to be a click. The "bang" object converts any control input that it receives into a bang. For example, you could use a number:

Numbers with many decimal places cannot be read in their entirety in a normal number box. You can enlarge the number box, however, by right-clicking on it, going to "Properties", entering a larger value for "width", and then clicking on "Ok".
Another important aspect relates to numbers larger than 999999. They are represented in a simplified form, namely as a product (with max. two decimal places) of 1000000. The number 1000000 is represented as "e+006".

The same applies to numbers smaller than -999999 and for those between 1 and -1 with more than four decimal places.
By default, objects and connections are (currently) carried out in the sequence (in time) in which they are created:

Of course, this cannot be seen and should be avoid for just that reason!
"f" stands for "floating point". In precise terms, this indicates a number that has decimal places and not a whole number. If you want to work only with whole numbers, you can always use "int" (abbrev. "i") instead of "float" in Pd. In contrast to Max/MSP, Pd works with floating points by default.
A "bang", like a mouse click, stands for the letter combination b-a-n-g. Letter combinations as symbols are the second form of data (besides numbers) that Pd uses. Some objects recognize certain words and work with their input. Many objects react to the symbol "bang". Since it occurs so frequently, there is a special graphic representation for "bang", a circle that flashes when active (Put Bang). This is called a "GUI" object (GUI = graphical user interface, i.e., a graphic representation of something and/or a graphic that can be changed to produce and send new values).

In this context, let's have a look at the "writesf~" object (an audio object will be introduced here due to the fact that symbols are usually used in this context; the object itself will be further explained in the audio chapter). This object saves sound as WAV files. It works like this: first we allocate a file in the message box to which the sound is to be stored in WAV format: "open [file name]". If, for example, the file is to be called "test.wav", then you would enter "open test.wav". Then we use the messages "start" and "stop" to start and stop the recording.
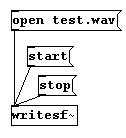
Usually you select a name and then start recording. Order is important, of course - before the "writesf~" object can begin recording, it has to know what the file is called that it is supposed to save to. This could be solved by using "trigger":
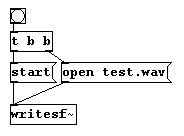
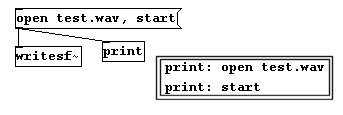
But messages can also be sent one after another by writing them into the same message box, separated by a comma:
The message "open test.wav" is a connection between two symbols (because it consists of two words separated by a space). This sort of succession of two or more symbols (or numbers) is called a "list". The "pack" object can create a list from several "elements". For the arguments, enter indications that specify what kind of elements the list should contain. A number, as with "trigger", is expressed with "float"* (or "f"), a symbol with "symbol" (or "s"). If you want to create a list that contains the messages "hello" and "43", use the "pack" object as shown:
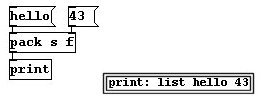
Once again: only when the leftmost inlet receives input is an (accurate) output generated. (If you click on "hello" first without having entered the right input for "pack", only "list hello 0" will result.) The output for the "pack" object can at this point only be seen with the "print" object. This then displays: "list hello 43". The elements of this list can, however, also be revealed using the inverse object (Pd has a lot of inverse objects) "unpack", which works according to the same principle as "pack", except that what appears here as output is the input for the "pack" object.
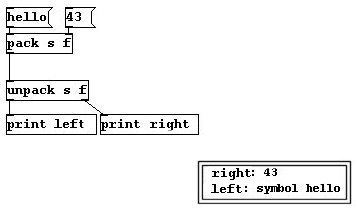
"print" now displays "43" and "symbol hello". Everything that is not a number is preceded by an indication (called a "selector") of its data type.
Also worthy of note: if you use a symbol anywhere but in the leftmost input for a "pack" object, it must appear like this:

One problem with "pack s s": the first input is the only one that doesn't have to be specifically labeled as a symbol. The second symbol must either be preceded by the word "symbol" in the message box or the message has to be converted using a "symbol" object:

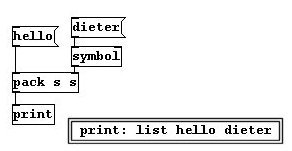
A final point on lists: a list that begins with a number needs not explicitly be labeled a list; if it begins with a symbol, however, the word "list" must be used.
Let's take a closer look at message boxes:
Variables can be integrated in a message box's contents. This is done in a similar fashion as with "expr", but not quite the same: first, the variables are called simply "$1, $2", etc. If you enter a number as input for the message "number $1", the output from the message box will be the complete expression with this number.
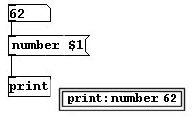
The use of several variables - e.g., "number $1 $2" - does not create a corresponding number of inlets (as it does with "expr"), but instead there remains just one inlet. You need to enter a list of numbers into this:
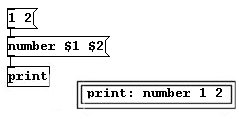
Symbols must be identified as such:
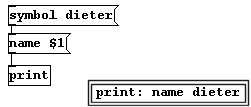
You can also completely redefine a message box's contents by preceding them with the symbol "set":

This changes the contents of a message box in execute mode (cf. the last point in 2.1.3).
Using a variable could, for example, turn the output of a number box into a message:

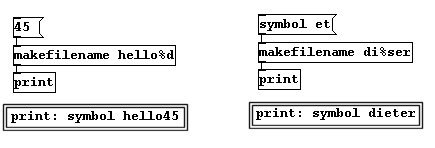
Ordinarily it is not possible to include a variable without a space to separate it. The "makefilename" object, however, makes this possible. Variables that can be included in arguments are "%d" for digits and "%s" for symbols:
The object "readsf~”" plays an existing sound file, e.g., one that is saved on the hard disk. It needs the message "open [name of sound file]". "Name of sound file" refers to the place where the file is stored on a data storage device. If you want to use "readsf~" in a patch that is saved in the directory c:/Pd/Pd-patches/ to play a sound file named "hallo.wav" that is also saved in the same directory, you only have to enter "open hallo.wav". If "hallo.wav" is saved in the directory c:/Pd/, however, you have to enter: "../hallo.wav" or if it's saved in c:/Pd/Pd-patches/soundfiles/, then "/soundfiles/hallo.wav". If it is in c:/soundfiles/ : "open ../../soundfiles/hallo.wav". Or if it is on another drive, e.g., d:/soundfiles, then you have to enter "open d:/soundfiles/hallo.wav".
These sometimes complicated directory path names can be more easily expressed using "openpanel". When it receives a bang, it opens a window with the available contents for all of a computer's drives. When you double-click on a file, "openpanel" enters the entire path for the file (as a symbol) in Pd:
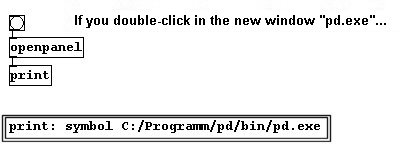
If a patch hasn't yet been saved, Pd (in Windows) assumes the path pd/bin/ .
As already explained with the "float" object (2.2.1.1.5), data can be saved within a patch with the objects "float", "symbol", and "lister" (but it's lost when you close the patch). "float" and "lister" are usually abbreviated to "f" and "l".
The right inlet receives a number, a symbol, or a list that is to be stored in the object. This stored data is sent as output when the object receives a bang in the left inlet.
A number, symbol, or list can also be sent directly into the left inlet; they are then immediately sent out as output (and are also saved in the object itself).
An object that can be used to sort various types of data is "route". It can also allocate the data type (number, symbol, list, bang)...

(Everything that cannot be allocated is sent out the right outlet.)
... as well as order lists according to names you have defined:
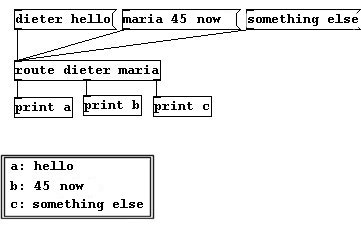
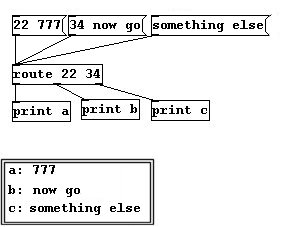
Numbers and symbols cannot be combined here. For example, "route 22 dieter" will not work.
"route" distributes an input to various outputs according to prefix. "demultiplex" (or "demux", both in Pd-extended version) distributes an input to various outputs according to the input of another inlet. First "demux" receives the numbers of the outlets as an argument, starting with 0: "demux 0 1 2 3".
In this example, there are two inlets ("demux" always has only two inlets) and four outlets (one for each of the four arguments). Enter a number in the right inlet that corresponds to the number of an outlet. Now whatever you enter (number, symbol, or list) in the left inlet comes out the third outlet:
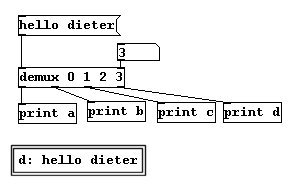
Note that Pd often begins counting not with 1, but with 0.
Another important object is "spigot". Depending on whether its right input is a 0 or a 1, "spigot" either sends an input through or not – like a gate that is either open or closed.
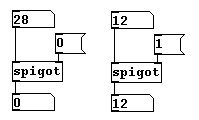
As you've seen with "spigot", "==", and other relational tests, 0 and 1 occur frequently in Pd. Due to this frequency – similar to "bang" for a mouse click – there is a graphic object for changing between 0 and 1 called "toggle" (Put Toggle or Shift-Ctrl-T).

Toggle looks like an on/off switch and can often be thought of as such. But you should always remember that the computer always interprets it as simply a change between 0 and 1.
By attaching a toggle to a "spigot" you can more clearly see if the "gate" is open or closed. Or to see if a relational test delivers a positive or negative result:

Let's see how these concepts work in practice:
Using a list to assign pitches to an oscillator coupled with dynamics:
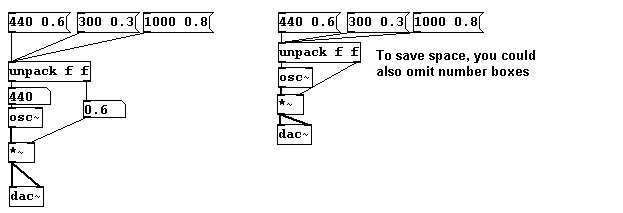
In the first example, we saw that a tone could be turned on and off using "1" and "0". You could use a toggle for this as shown:

Here's a counter that sends a particular pitch to the oscillator every time it receives a bang:
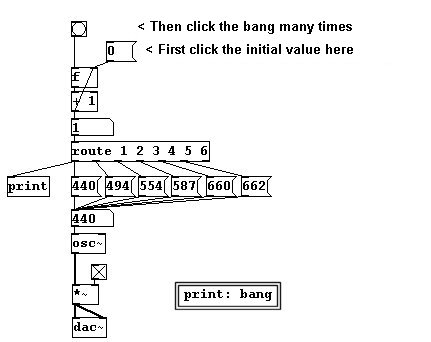
When, instead of a list, "route" receives an input value that is equivalent to one of its arguments, it sends a bang out of the corresponding outlet. In this example, "route" functions as a combination of several selectors (another possibility would be to attach a series of "sel-" objects to the counter: "sel 1", "sel 2", etc.).
The "route" object's rightmost outlet doesn't need to be connected to anything as long as the input always corresponds to the "route" object's arguments.
Here's a counter that counts upward starting at 10 and stops at 17:
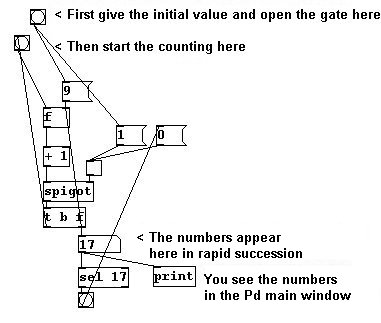
This could be useful to, say, quickly calculate values for a mathematical function within a given range. This example shows the simple quadratic function y = 2x for the range of 1 to 10:
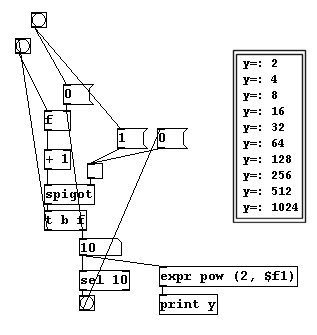
For recursions (where an output is fed back as an input) such as these, you have to be very careful to avoid an infinite loop. If we restart this patch after it has already run once without reentering the initial value but instead just opening the gate and starting the calculation, it will start above ten and keep counting forever (as the sel 10 object that stops the calculation will never occur).
a) Create a sequence of lists with pitches and dynamics.
b) Create a patch that allows you to use a list of two numbers, which represent the first and last values in a range for x, to calculate values for y in an equation – e.g., values for the function y = 3x from x = -2 to x = 4.
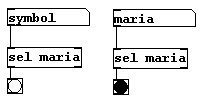
Symbol boxes function analogously to number boxes (but are seldom used in Pd). For example, "sel" could also be used with symbols:
There are two other GUI objects on the control level: the slider and the radio. The slider (Put HSlider or VSlider or their shortcuts) is a graphic representation of a number box. It is, however, restricted to a range (with a default setting of 0 to 127):

The radio (Put Hradio or Vradio) is also a graphic representation of a number box, but extremely limited: only a few numbers (by default from 0 to 7) can be sent out, which is accomplished by simply clicking on a box.

Sliders and radios can be horizontal or vertical; this is only a difference in appearance and doesn't affect their function.
A "float" specification can (e.g., with "trigger") often be expressed with a number instead of with an "f" in Pd (the value of which can sometimes play a role, but not always - e.g., it could be valid with "f" or "pack" but not with "t"):

However, as this is certainly detrimental to clarity, the use of numbers is not recommended.
A few general observations regarding boxes: 1. Strictly speaking, all boxes are objects that can send and receive messages as well as react to these messages according to their (the boxes') characteristics. 2. The connections show which object sends messages to which other objects. If an object's outlet is connected to inlets of several other objects, then all of these objects receive the message. Order is (intentionally) not defined. 3. There are GUI objects that create and send messages based on user interaction. Examples of GUI objects: bang, toggle, slider, and canvas.
Music, as is commonly known, takes place in time. Therefore, it is essential that an audio programming language has the capability to control the chronological sequence (i.e., that durations/rhythms and sequences of events can be created).
The first basic object for controlling the chronological sequence is called "metro". As the name implies, this is a metronome. When you turn it on or off (using 1/0 in the left input or with toggle), bangs occur at the regular interval that is determined by the argument or the right input.
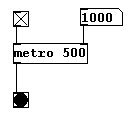
The tempo is set in milliseconds (ms), which are thousands of a second. If you want to send a bang once per second, enter "metro 1000", "metro 2000" for a bang every two seconds, "metro 500" for a bang every 1/2 second (equal to quarter note = 120).
"delay" ("del") delays an incoming bang by the number of milliseconds in the argument or the right input:
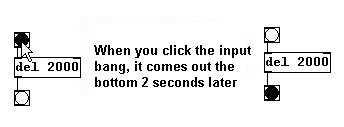
"pipe" achieves the same thing with numbers and symbols as "delay" does with bangs. The duration of the delay is entered as an argument. By default, "pipe" expects a number as input.

If you want to send a symbol through, this must first be entered as an argument (with "s", as with "route"). Second (or as the right input), you determine the duration:

Also, "pipe" - like "pack"/"unpack" - can have several inlets and outlets:
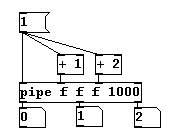
"pipe" handles lists like "route":
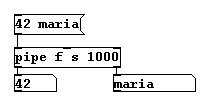
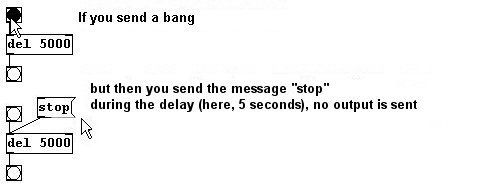
If an input is 'waiting' in a "del" or "pipe" object, it can be deleted before being sent with the message "clear" (pipe) or "stop" (delay):
With "line", you can create a series of numbers in time. In other words, you can command the program to start counting within a restricted range, the start and end values of which you determine. "line" normally contains no argument. The right input is the duration of the series of numbers (by default 0). The left input is the target value (by default 0; this can be entered differently in the argument).
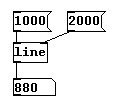
If you enter a new target value on the left, Pd jumps right to this value. This is because the value on the right was automatically reset to 0 and has to be reentered (this is an exception in Pd; usually Pd objects save their "cold" inlets until they are reset). Alternatively, you could enter both values (target value and duration) as a list:
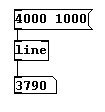
If you click on the message box, nothing happens because "line" has arrived at 4000 and has remained there. If you enter a new target value into the list - e.g., 50 - "line" counts from 4000 to 50 (in 1000 milliseconds).
If you want to begin with a particular number and count to another number within a certain time frame, you have to first enter a value in the left input (without having entered anything in the right input). This will cause "line" to jump to this starting value (with one single message box); then you can enter the list. As previously mentioned in 2.2.2.1.2, you can include several messages in a single message box, provided you separate them with commas, like this:
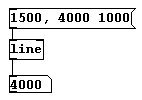
In this example, every time the message box is clicked, "line" counts from 1500 to 4000 in 1000 milliseconds.
"timer" is like a stopwatch. Connect bangs to both inputs. The time measured is always the time between the left bang (which, of course, must be given first) and the right one (in milliseconds):
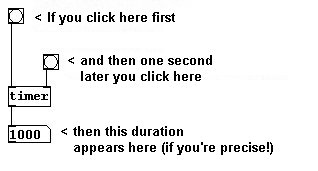
Here you can see that trigger operations do not result in any time expenditure for the computer, even though they occur one after another:

(cf. 2.2.2.2.5)
"timer" is (somewhat unnecessarily) an exception to the Pd rule that inputs must always occur from right to left.
Now we can realize quite complicated musical configurations. For example, a quick random melody that runs automatically:
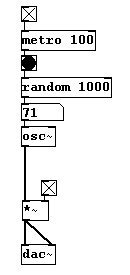
Try out various metronome speeds with the above example (a number box as right input into "metro")!
You can also create irregular rhythms on the basis of random selection:

In this example, the "metro" object's bangs are sent at an interval of between 0 and 999 milliseconds (selected randomly). If you want, say, durations of between 500 and 1500 milliseconds, you just have to use simple addition:
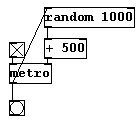
An addition to a mathematical operation such as this one (here "+ 500") is called an "offset".
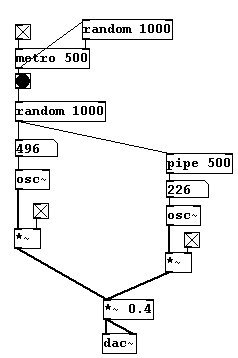
These rhythms can then be connected to the random generator and transferred to another oscillator to make a rhythmical canon:
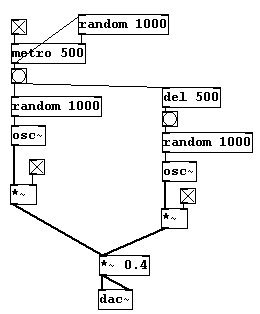
(The "*~ 0.4" will be explained later.)
Or you can just make a true canon:
Or as crescendi and decrescendi ("sig~" will also be explained later):
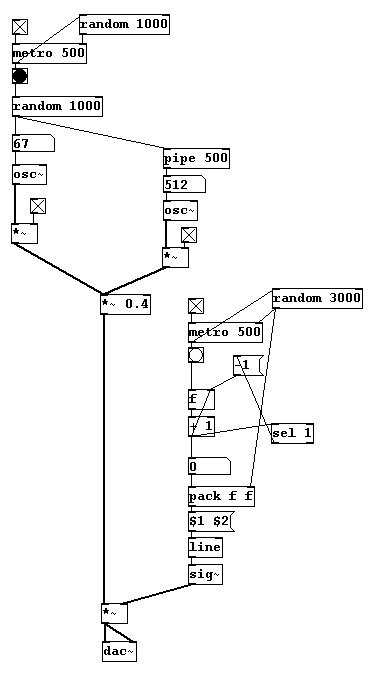
Here again you can see that, for the time being, Pd uses only numbers for calculations. A crescendo is as much a series of numbers as is a glissando. You could also say: a crescendo is a dynamic glissando.
You could build a metronome like this:
First, let's make a working visual model, i.e. such that the metronome signal creates a bang that can be seen. Metronome markings are given as beats per minute, just like in a musical score: quarter note = 60, quarter note = 100 etc.
So you have to convert bpm (beats per minute) into milliseconds:

Now use this result as the input for a metronome.
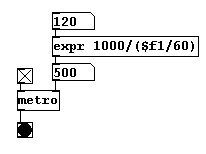
Now we don't want to just see these impulses as a bang, but also hear them. Let's use the sound patch from earlier and set it so that a short tone is heard with each bang. You can create a short tone like this:
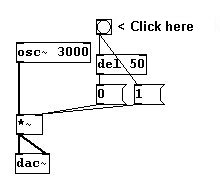
All together:
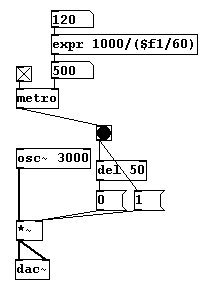
Once these connections are made, the metronome is finished. Later you'll learn how to incorporate an alternative sound signal.
a) Create a random melody that jumps to the next tone twice per second (alternatively: with a glissando).
b) Create a metronome with irregular random rhythms (with an adjustable average tempo).
c) Create a metronome that beats five times in tempo Quarter = 60 and five times in tempo Quarter = 100.
d) Create a random melody that changes every two seconds from a fairly high register to a fairly low one.
As you saw with "line", in Pd you can enter a list in the leftmost inlet of an object that has several inlets instead of connecting something to all the object's inlets (however, there are objects for which this will not work). The elements in the list are then distributed to the inlets from right to left:

The time resolution for tasks on the control level is in milliseconds.
However, this is often not preset. You can imagine that a calculation in milliseconds requires a lot of processing power (also called CPU*). For "line", for example, the preset is that steps occur at intervals of 20 milliseconds:
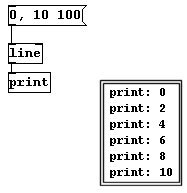
If you want to count from 0 to 10 in 100 milliseconds, the computer executes a step every 20 milliseconds; this is why the output numbers have gaps.
This interval (in milliseconds) can be adjusted in the "line" object, as a second argument (the first gives the primary target value for the counting process, which is eventually replaced by the input):
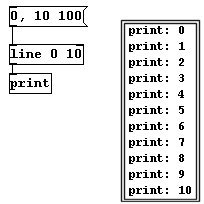
You should be aware that the result will only be "clean" as long as the computer's processing power is high enough. Otherwise, there will be errors.
*CPU = central processing unit. There are often also other processors, e.g., in the graphics card, where special graphic operations are calculated.
To improve Pd's "handling", there are several additional options.
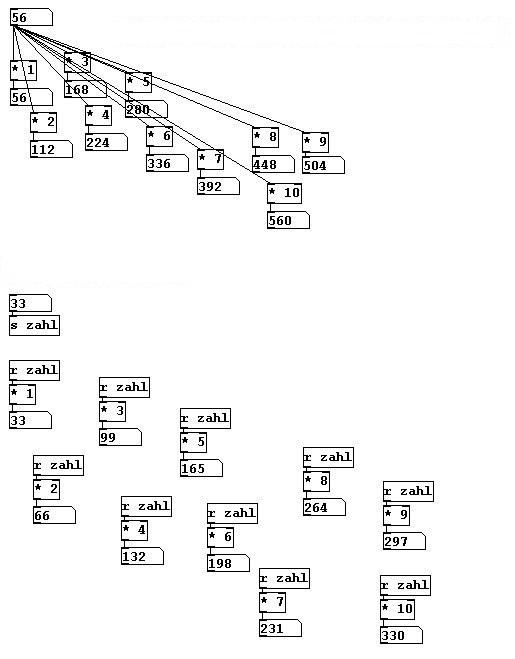
To avoid needing to connect all boxes with 'cables,' it is possible to use the objects "send" and "receive" to send and receive things.
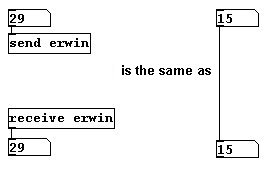
The argument for a "send" object can be any name. A "receive" object having the same name as its argument receives input from the "send" object and sends it further.
"send"/"receive" (or "s" and "r") are practical when you need data in the form of a number to be sent to many different locations (though this may make the patch more difficult to understand).
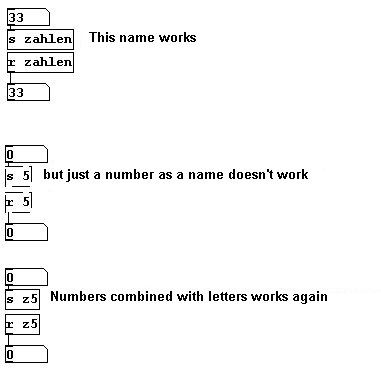
Such freely chosen names (we'll return to this later) must always be entered without spaces between letters; individual numbers are not allowed.
If you have different receivers (with different names), you can use "remote" to allocate messages from a central "distribution point" (similar to "route"). You give this object a list whose first element is the name of the receiver and whose second element is the message itself. "remote" is part of Pd-extended.
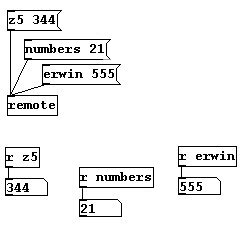
Another possibility is to precede the list with a semicolon in the message box. In this case, you need only click on the message box to send the message.

You can also send many different messages in a message box (with one click):
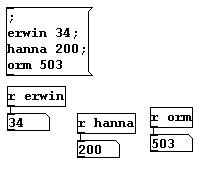
In message boxes, two punctuation marks have a special importance: commas (a series of many messages) and semicolon (which represent the sender).
N.B.: in message boxes, Pd automatically skips a line after a semicolon. If you write the following:

and then copy the entry (Ctrl-D) or close and reopen the patch, you will see this:

This is also the case for a comment (2.1.4.5.).
You might like to keep several values for the next time you open a patch or there might be a particular value that you want to receive a bang right at the start. To achieve either of these, you could use the "loadbang" object (sends a bang as soon as a patch is opened) and "init" (abbreviation: "ii"), which sends a number or symbol (or a list of numbers, of symbols, or of numbers and symbols) as output (Pd-extended).


GUI stands for "graphical user interface" and refers to all special graphic objects in Pd. GUI objects are number and symbol boxes, bang, toggle, slider, radio, canvas, as well as array and VU, both of which will be explained later. All GUI objects have extended functions. To access these, right-click on the object and choose "Properties" from the pull-down menu with the left mouse button.

The following can be set here:
width refers to the width of the box. This can be useful in conjunction with very large numbers or numbers with many decimal places.
Use the lower and upper limit to adjust the range of values that the box will accept (for example, for numbers you might use a range of 0 to 1000).
With label you can assign the box a name for it to display (including the position where the name will appear).
With receive/send, you can build a send/receive function into the box. For example, if you enter "post1" in 'send,' and have a receiver somewhere called "post1", this receiver will receive all entries made in the number box. The same is true for the "receive" function.
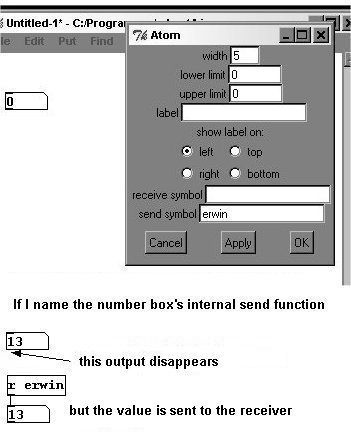
As you can see in the graphic, the inlet and outlets disappear when the internal send or receive functions are activated.
The changes take effect when you click on "apply" or on "ok".
size refers to the changeable size (in pixels).
intrrpt/hold indicates how long the bang lights up (in milliseconds).
init means that the value (in this case, a bang) will be sent as output as soon as the patch is opened (as with 'loadbang').
The send symbol / receive symbol is like the internal "send-" / "receive" function in a number box.
With name you can create a "label", as with number boxes. The position is determined with x and y values. In addition, you can define the font style and size as well as the colors for the background, foreground, and the name. First choose the element you want to change, ...

... then select a color from the given color options:

Under "compose color" you can also generate your own color.
"backgd" refers to the background, i.e., the entire area of the bang. "front" refers to the foreground, i.e., the color that briefly lights up when the bang is active (due to an input or by a mouse click).
All changes take effect when you click "apply" or "ok".
This works analogously to a bang, except for value: by default, 'toggle' alternates between 0 and 1. Here, you can enter another value for the 0 (the 1 is always a 1).
width: width in pixels
height: height in pixels
bottom: value of the slider when it's all the way down
top: value of the slider when it's all the way up
lin: Either linear or logarithmic addition/subtraction within the range. If you click on it, "log" appears in the field. The current setting is always the one that you can currently read.
N.B.: With "log", '0' cannot be chosen as a benchmark figure.

init: The lower value in the range is sent as output when the patch is opened.
steady on click: The slider is moved by moving the mouse with the button held. If you click on "steady on click", then "jump on click" appears, which causes the slider to move immediately to wherever you click within the slider GUI object.
The rest works as with 'bang.'
With 'radio,' everything works the same way as for all the others except for number: the number of boxes.
At the end of 2.1.2. you learned that the white surface on which objects are placed is called the "canvas". We could also add other colored surfaces (Put Canvas). They have no function apart from being colored surfaces.
The surface contains a blue square in the upper left - that is the actual object. The entire surface is a product of this object, its output so to speak. It covers all the elements that were there before you created it and lies underneath everything you create thereafter.
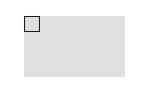
The properties are the same as for the other GUI objects.
In the course of programming, you will probably find that you run out of room at some point. For this reason, you can store parts of your patch in what are called "Subpatches". If you create a "pd" object and enter a name (without spaces) as its argument - e.g., "pd my-subpatch" - a new window opens. (Once you've closed this window, you can reopen it in execute mode by clicking on the object "pd my-subpatch" once.) Now you have room for new parts of your patch.
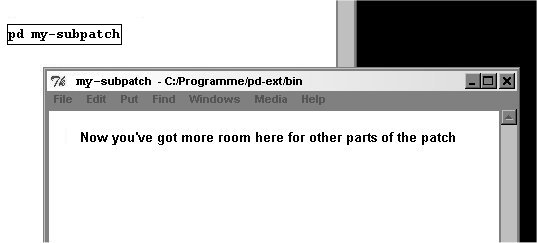
There are two ways to connect this subpatch to the first window in your patch: "send" and "receive" work both within the same window and between different ones:
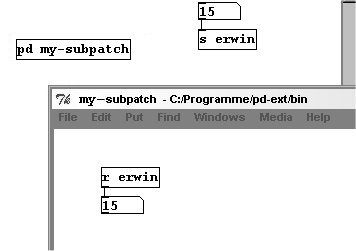
Here you can also see how you can switch between execute mode and edit mode independently in different windows.
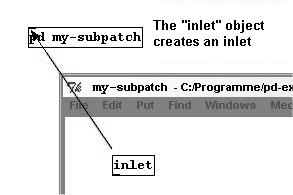
The other way to create a connection is by using the inlet and outlet objects. If you create an "inlet" object in the subpatch, the object for the subpatch (which is located in the first window and is called "pd my-subpatch") now has a visible inlet.
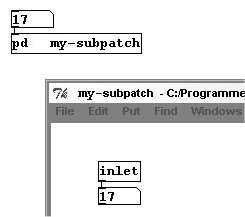
If you enter a number as input in the main window, this will appear in the subpatch.
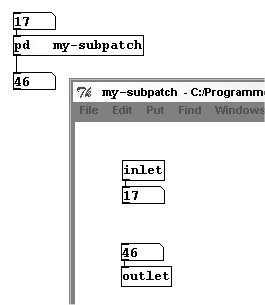
The "outlet" object works in a similar way:
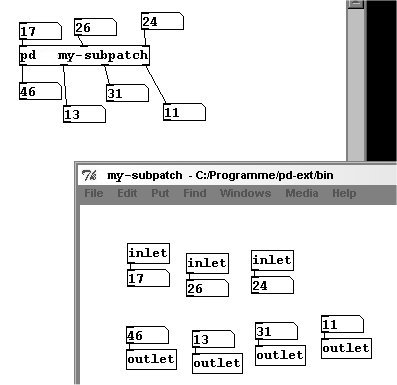
Several "inlet" or "outlet" objects are placed next to one another in the subpatch analogously to their arrangement in the subpatch object in the main window:
When you close the subpatch window, the subpatch remains active (i.e., still executes processing tasks) as long as the main patch window is open.
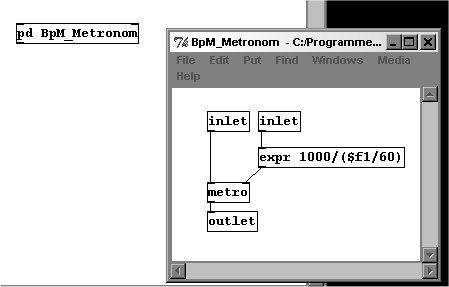
Subpatches solve not only spatial limitations, but also help you structure your patch more clearly. Parts of a patch that complete a certain task can be given their own subpatch, so that this little 'machine' is always available. A part like this is called a "module". Here's a sample module: a metronome that allows you to enter beats per minute instead of milliseconds:
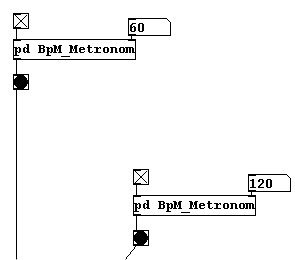
Names you choose yourself cannot contain spaces. Instead you can use hyphens or underscores, as in this example.